Note
Go to the end to download the full example code
Constructing Structural Geological Model
This example illustrates how to construct a 3D geological model of a deposit using GemPy.
# Import necessary libraries
import time
import numpy as np
import os
from dotenv import dotenv_values
from vector_geology.omf_to_gempy import process_file
import gempy as gp
import gempy_viewer as gpv
from vector_geology.model_building_functions import optimize_nuggets_for_group
from gempy_engine.core.data.kernel_classes.kernel_functions import AvailableKernelFunctions

# Start timer to track execution time
start_time = time.time()
Load the data necessary for model construction. This involves processing data from nc files and organizing it for use in the geological model.
config = dotenv_values()
path = config.get("PATH_TO_MODEL_1_Subsurface")
structural_elements = []
global_extent = None
color_gen = gp.data.ColorsGenerator()

for filename in os.listdir(path):
    base, ext = os.path.splitext(filename)
    if ext == '.nc':
        structural_element, global_extent = process_file(os.path.join(path, filename), global_extent, color_gen)
        structural_elements.append(structural_element)
Setting Up GemPy Model
Configure the GemPy model object, including defining structural groups and configuring their properties. This is a crucial step in setting up the structural framework of the geological model.
# Define structural groups and their relationships
structural_group_red = gp.data.StructuralGroup(
    name="Red",
    elements=[structural_elements[i] for i in [0, 4, 8]],
    structural_relation=gp.data.StackRelationType.ERODE
)
structural_group_green = gp.data.StructuralGroup(
    name="Green",
    elements=[structural_elements[i] for i in [5]],
    structural_relation=gp.data.StackRelationType.ERODE
)
structural_group_blue = gp.data.StructuralGroup(
    name="Blue",
    elements=[structural_elements[i] for i in [2, 3]],
    structural_relation=gp.data.StackRelationType.ERODE
)
structural_group_intrusion = gp.data.StructuralGroup(
    name="Intrusion",
    elements=[structural_elements[i] for i in [1]],
    structural_relation=gp.data.StackRelationType.ERODE
)

# Combine structural groups into a frame
structural_groups = [structural_group_intrusion, structural_group_green, structural_group_blue, structural_group_red]
structural_frame = gp.data.StructuralFrame(
    structural_groups=structural_groups[2:],
    color_gen=color_gen
)

# Create the GeoModel object
geo_model: gp.data.GeoModel = gp.create_geomodel(
    project_name='Tutorial_ch1_1_Basics',
    extent=global_extent,
    refinement=5,
    structural_frame=structural_frame
)
Incorporate topography into the model using a dataset in nc format. This adds realism to the model by including surface variations.
import xarray as xr

dataset: xr.Dataset = xr.open_dataset(os.path.join(path, "Topography.nc"))
gp.set_topography_from_arrays(
    grid=geo_model.grid,
    xyz_vertices=dataset.vertex.values
)
Active grids: GridTypes.NONE|TOPOGRAPHY|OCTREE

<gempy.core.data.grid_modules.topography.Topography object at 0x7f2eaa335ff0>
Optimizing Nuggets
Nuggets add a small random noise to the data to account for discrepancies in complex geometries. Here, we optimize the nugget value to balance between overfitting and underfitting the data.
TRIGGER_OPTIMIZE_NUGGETS = False
APPLY_OPTIMIZED_NUGGETS = True
if TRIGGER_OPTIMIZE_NUGGETS:
    geo_model.interpolation_options.cache_mode = gp.data.InterpolationOptions.CacheMode.NO_CACHE

    # Optimization process for different structural groups
    geo_model.interpolation_options.kernel_options.range = 0.7
    geo_model.interpolation_options.kernel_options.c_o = 4
    optimize_nuggets_for_group(
        geo_model=geo_model,
        structural_group=structural_group_red,
        plot_evaluation=False,
        plot_result=True
    )
    geo_model.interpolation_options.kernel_options.range = 2
    geo_model.interpolation_options.kernel_options.c_o = 4
    optimize_nuggets_for_group(
        geo_model=geo_model,
        structural_group=structural_group_blue,
        plot_evaluation=False,
        plot_result=False
    )
    optimize_nuggets_for_group(
        geo_model=geo_model,
        structural_group=structural_group_green,
        plot_evaluation=False,
        plot_result=True
    )

if APPLY_OPTIMIZED_NUGGETS:
    # Apply optimized nuggets to the model
    loaded_nuggets_red = np.load("../temp/nuggets_Red.npy")
    loaded_nuggets_green = np.load("../temp/nuggets_Green.npy")
    loaded_nuggets_blue = np.load("../temp/nuggets_Blue.npy")
    gp.modify_surface_points(
        geo_model,
        slice=None,
        elements_names=[element.name for element in geo_model.structural_frame.get_group_by_name('Red').elements],
        nugget=loaded_nuggets_red
    )
    if True:  # Conditional application of nuggets
        gp.modify_surface_points(
            geo_model,
            slice=None,
            elements_names=[element.name for element in geo_model.structural_frame.get_group_by_name('Blue').elements],
            nugget=loaded_nuggets_blue
        )
Compute the geological model. This involves setting interpolation options and executing the computation to generate the 3D geological structure.
geo_model.interpolation_options.mesh_extraction = True
geo_model.interpolation_options.kernel_options.range = .7
geo_model.interpolation_options.kernel_options.c_o = 3
geo_model.interpolation_options.kernel_options.compute_condition_number = True
geo_model.interpolation_options.kernel_options.kernel_function = AvailableKernelFunctions.cubic

# Update color and transformation settings for visual distinction
geo_model.structural_frame.get_element_by_name("KKR").color = "#A46283"
geo_model.structural_frame.get_element_by_name("LGR").color = "#6394A4"
geo_model.structural_frame.get_element_by_name("WAL").color = "#72A473"
geo_model.structural_frame.get_element_by_name("ABL").color = "#1D3943"
geo_model.structural_frame.basement_color = "#8B4220"

geo_model.update_transform()

# Execute the model computation
gp.compute_model(
    geo_model,
    engine_config=gp.data.GemPyEngineConfig(
        backend=gp.data.AvailableBackends.PYTORCH,
        dtype="float64"
    ),
)
Setting Backend To: AvailableBackends.PYTORCH
Condition number: 146830.09028250765.
Condition number: 276736.9518433538.
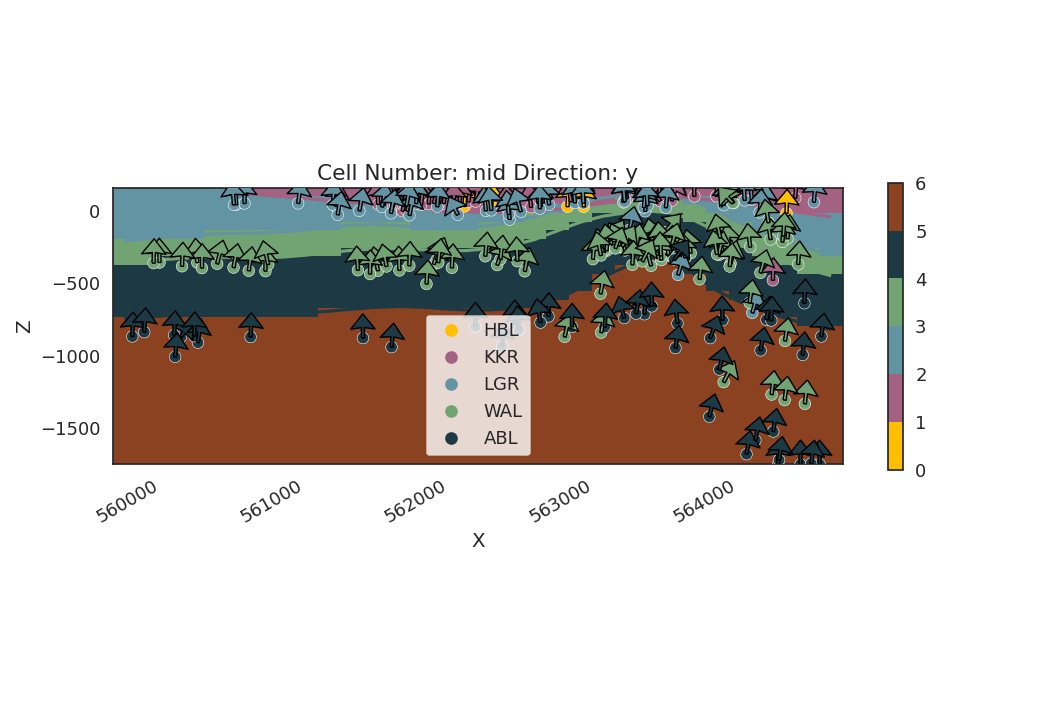
Visualize the constructed geological model in both 2D and 3D formats to assess the structure and layout.
# 2D visualization of the model
gpv.plot_2d(geo_model, show_scalar=False)
<gempy_viewer.modules.plot_2d.visualization_2d.Plot2D object at 0x7f2ef511cac0>
3D visualization in GemPy viewer
gempy_vista = gpv.plot_3d(
    model=geo_model,
    show=True,
    kwargs_plot_structured_grid={'opacity': 0.8}
)

Measure the total time taken to execute the script, providing insights into performance.
end_time = time.time()
execution_time = end_time - start_time
print(f"The function executed in {execution_time} seconds.")

# sphinx_gallery_thumbnail_number = -1
The function executed in 10.007350206375122 seconds.
Total running time of the script: (0 minutes 10.189 seconds)